The information below provides the baseline configuration for NC State’s Jamf Pro environment to meet the control requirements of the Endpoint Protection Standard.
All NC State Jamf Pro administrators must implement these baseline controls in their Jamf Pro Site.
If a group is not able to meet these controls, an IT Exception must be submitted to Security & Compliance via this exception request form.
As always TEST policies and profiles on a small group of devices before deploying them to an entire Site.
Note that other helpful documentation about setting up Apple device management in Jamf Pro can be found at go.ncsu.edu/jamfcheat.
Quick Index
Endpoint Protection Standard RUL 08.00.18 – Endpoint Protection Standard
AntiMalware/Antivirus
Application Control
Authentication
Encrypted Network Communication
Full Disk Encryption (with key escrow)
Host-based Firewall
Least Privilege Access
Software Inventory
Web Reputation Filtering
Patch Standard RUL 08.00.14 – System and Software Security Patching Standard
While not strictly part of the Endpoint Protection Standard the University Patch Standard must be implemented at as a complete defense against threats on university data.
macOS Patching
AntiMalware/Antivirus
Use a Jamf Policy to install DetectX as a supplement to Apple’s XProtect.
Two policies are needed to ensure proper install and scanning.
Full documentation is on the DetectX Setup for Jamf Pro page.
Authentication
Use a Apple Configuration Profile in Jamf Pro to ensure that the Login Window option has setting for:
1) Window tab is set to show Name and Password Fields for the Login Prompt as in Figure 1.
2) Options tab is set to Disable Automatic Login as in Figure 2.
Apple Kerberos Single Sign On Extension
Additionally use a Jamf Configuration Profile to enable the built-in Apple Kerberos Single Sign On Extension(SSOE) provided with every macOS devices running 10.15 or newer. This built-in security feature of macOS will keep the local account password in sync with the campus WOLFTECH directory. See:
https://docs.google.com/document/d/1ZRdpM1atzSsITfGFSRYCQTcLajnfznr8mbAeZR98Uz8/edit?usp=sharing
Host-based Firewall
Use a custom Apple Configuration Profile that enables the Firewall and enables Stealth Mode. In Jamf Pro upload into the Configuration Profiles tab the custom profile that manages just the firewall preferences in the com.apple.security.firewall preference domain from
While Jamf Pro does have a Security & Privacy Option payload, setting just the Firewall in this option locks out the management of other important settings from user control. The by uploading the custom profile only the needed settings are locked.
Least Privilege Access
Meeting this control is simply setup methodology where accounts are not created with full administrative access to the device. In macOS, Apple allows creation of Administrator, Standard, and Sharing Only accounts. Creating new users with the account type Standard will meet the control. Commonly you will hear complaints from end users that this does not allow them to install software. The intent of this control is to protect the data stored on the device NOT to keep software from being installed! In today’s world software can be run from external storage like key drives or even directly downloading to the home directory and running from there where no extra permissions are required. Best practice for software installation is the direct clients to use Jamf Self Service.app as no elevation of permissions are needed. If software installation permissions are needed these can be granted using the authorization database without giving full administrative access.
To allow installation of software only create a Jamf policy which configures the Files and Processes Option to have an Execute Command of:
/usr/bin/security authorizationdb write system.install.software <<< $(/usr/bin/security authorizationdb read system.install.software | /usr/bin/sed 's/admin/staff/g')
This uses the security command line tool to read the system.install.software rule in the authorization database replace the value of the group setting with the group staff and write it back again. All users are in the staff group and this will not interrupt the builtin Apple install mechanisms nor those used by configuration management. To verify that this worked use the command line:
/usr/bin/security authorizationdb read system.install.software
And look for the group key:
<key>group</key>
<string>staff</string>
Note: Standard Users will still have to type in their username and password to complete the install but admin permissions are not required.
For situations where full administrative access is actually the least privilege required, time limited privilege elevation can be granted using the Privileges.app from https://github.com/SAP/macOS-enterprise-privileges or using the setting in Jamf Connect ( https://learn.jamf.com/en-US/bundle/jamf-connect-documentation-current/page/Privilege_Elevation_Local_Accounts.html)The installer for Privileges.app is available in the campus configuration management system and does not require a license. Jamf Connect is built-in to Jamf Pro in the Jamf Apps section and as a Jamf Catalog App but does require a paid license configuration profile(Contact OIT Licensing to purchase). Read the documentation for setup as there are several options.
Software Inventory
When an Apple device is enrolled into the campus configuration management system (Jamf Pro) a software inventory is automatically collected and updated on a daily basis. Some policies also update the device inventory after running. To force the inventory to update use the jamf command line tool in Terminal.app to run: /usr/local/bin/jamf recon
Web Reputation Filtering
This control is met by installing and patching modern web browsers such as Safari or Google Chrome since these browser vendors have built in safeguards against known bad browsing sites.
Application Control
Deny Application Execution
Use the Jamf Pro Restricted Software feature to set restrictions on applications that are not allowed to run by the process name. Using the process name means that moving or renaming the app will not circumvent the control. In Jamf under the Computers tab, click on Restricted Software in the side bar and add a new restriction. Here we will restrict the Chess.app game from running.
First we need to find the process name by viewing the contents of the application bundle. Right clicking on the Chess.app icon in the Applications folder and selecting “Show Package Contents” using the Finder will show the application’s bundle contents. Look in the Contents folder inside the MacOS folder as shown:
Once we have the correct process name “Chess” we can complete the restriction as shown:
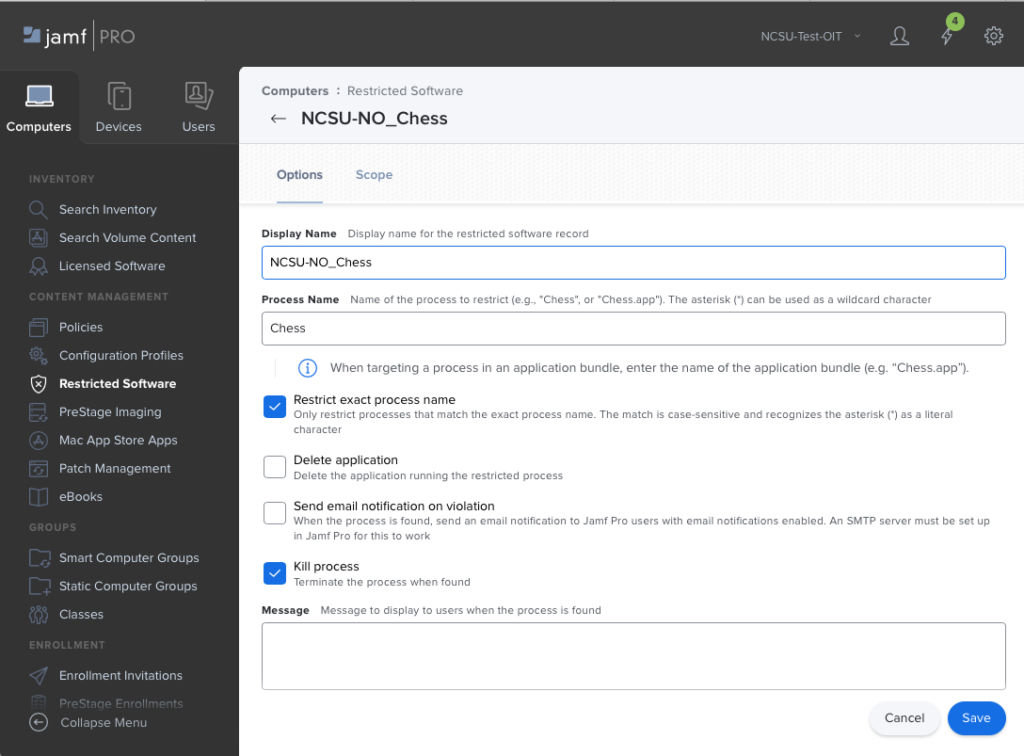 Fill out the Display name with something descriptive, put the exact, case sensitive process name in the Process Name field and check at least the Kill process box. One may choose to have the application Deleted, and/or send email on violation. A restriction must be made for each application process to be denied. Be aware that some applications may have frameworks and libraries that are not removed by the Jamf Delete Application option and an uninstaller from the vendor or a custom script may be needed for complete uninstall.
Allow Application Execution
Use a macOS Configuration profile with the Parental Controls: Application Access (id: com.apple.applicationaccess.new) payload to create an allow list for applications that can run. Download the NCSU-Allow Applications-Template.mobileconfig file that can be modified with Profile Creator.app to add the desired apps. When desired applications are added just use the Upload button in the Configuration Profiles side bar of the Computers tab in Jamf Pro to import and scope.
Other Considerations
Be aware that there are other methods that could be used to allow or deny application execution.
Apple requires all applications to get permission to use certain resources on a device. These resources are called entitlements and they can be denied using various profiles mostly associated with the Security & Privacy System Preferences panel. While none will deny applications running, they can deny access to entitlements like Full Disk Access, Files and Folders, etc in a way as to make the app unable to access data rendering it useless.
Here are some additional resources:
Apple Profile Documentation
https://developer.apple.com/documentation/devicemanagement/parentalcontrolsapplicationrestrictions
3rd Party workflow for Blocking Apps
https://derflounder.wordpress.com/2017/05/20/application-blacklisting-using-management-profiles
Using GateKeeper to create allow/deny lists
https://apple.stackexchange.com/questions/313373/block-specific-apps-on-macos
Encrypted Network Communication
Part of meeting the Encrypted Network Communication control of the Endpoint Protection Standard is to make it as easy as possible to use the eduroam encrypted network available on campus and at supporting institutions around the world. To do this create a Jamf configuration profile that uses device certificates to automatically join our eduroam wireless network.
- Use the side bar under the Computers tab to select Configuration Profiles and create a new profile using the +New button.
- In the General option give the profile a descriptive name, description, and leave Distribution Method set to “Install Automatically”.
- Select the Certificate option and configure to add 3 certificates.
- Name the first Certificate “NCSU-Device-Eduroam” or something appropriate
Use the Select Certificate Option drop down to pick “North Carolina State University Root CA256-RSA”
Set the Certificate Subject to “CN=$SERIALNUMBER@JAMF.NCSU.EDU” NOTE: this must be exact and case matters
Set the Subject Alternative Name Type to “DNS Name” from the drop down.
Set the Subject Alternative Name Value to “$SERIALNUMBER@JAMF.NCSU.EDU” NOTE: again must be exact and case matters
Set the Template Name to “NCSU-eduroam-JAMF” NOTE: yes again must be exact and case matters!
Finally check the box for “Allow all apps access” but leave “Allow export from keychain” unchecked - Use the + button to add a second certificate by uploading a copy of the InCommon RSA Server CA.cer from
https://drive.google.com/file/d/1dDxTa8UxbPnO9CPGjKPC8TBhhArnZfET/view?usp=share_link Note: login required to download.
Name the certificate InCommon RSA Server CA or something appropriate. Leave the passwords blank and leave all check boxes as configured. - Use the + button to add a 3rd and final certificate “North Carolina State University Root CA256-RSA” by uploading
https://drive.google.com/file/d/1eljlWE3nngEqMQw4e2sbZkVD0BS7cM2D/view?usp=sharing Note: login required to download
Name the certificate North Carolina State University Root CA256-RSA or something appropriate. Leave the passwords blank and leave all check boxes as configured.
- Name the first Certificate “NCSU-Device-Eduroam” or something appropriate
- Now the Certificate option is finished and a Network option in this same profile must be configured
- Select the Network option from the side bar and configure the Network Interface to WiFi checking the Hidden Network and Auto Join options
- Set the Service Set Identifier (SSID) to “eduroam”
- The Proxy should remain as None
- Set the Security Type to “WPA2 Enterprise” from the drop down menu.
- Under the Protocols tab select TLS check box
- Set the User Name to “$SERIALNUMBER@JAMF.NCSU.EDU” NOTE: must be exact and case matters
- Now select the Identity certificate as “NCSU-Device-Eduroam” ( or the name you gave the first certificate created earlier).
- Leave everything else default and select the Trust tab and make that the Username and Identity Certificate are the same as on the Protocols tab.
- Next under Trusted Certificates check the boxes beside the other 2 certificates uploaded earlier: InCommon RSA Server CA and North Carolina State University Root CA256-RSA to have macOS automatically trust them for all users in the KeyChain. This is so the client will not see a dialog asking for them to be approved when the profile installs.
- Then under "Trusted Server Certificate Names" add a "CERTIFICATE COMMON NAME" of
radius.comtech.ncsu.edu - At the bottom check Allow Trust Exceptions
Finally scope and save the profile as desired.
See these screen shots for example profile settings:
Full Disk Encryption
The easiest way to meet this control is to us the Security and Privacy option built into the Jamf Pro Configuration Profiles feature which allows enabling and setting only the select features you need of File Vault II. Note that these settings are for macOS 13 or newer and older version of macOS are not supported.
Best practice for File Vault II settings is to create a new configuration profile filling out the required General options and then selecting Security and Privacy and selecting File Vault. Note both the Security and Privacy General and the Firewall settings should be in a separate profiles. Next select Exclude all button in the upper right to ensure there are no settings included that are not specifically set. Each of the items in the Option has 2 settings 1) Include and 2) actual configuration values.
Include ONLY the following settings with these values:
Event to prompt FileVault enablement - At Login
Allow users to bypass FileVault prompts at login - Custom 1
Recovery keys - Personal Recovery Key
Display personal recovery key to user - Hide
User adjustment of FileVault options - This setting is Included automatically and should NOT be changed
Escrow Personal Recovery Key:Encryption Method - Automatically Encrypt and Decrypt Recovery Key
Escrow Location Description - add the text "FileVault Key is Escrowed in the Configuration Management service"
“Record Number” Message - leave this field blank
The web form in Jamf Pro should look like these pictures:
NOTES:
1) The "Allow users to bypass FileVault prompts at login" setting can be set to a custom number of attempts but at least 1 deferral is advised.
2) The "Display personal recovery key to user" is discretionary but the recovery key will be escrowed in Jamf Pro so only serves to slow down installs if presented.
Note on off boarding devices with File Vault II enabled:
Most Apple devices use flash storage with APFS volumes and not spinning hardware disks. It is important when off-boarding encrypted devices for surplus that they be cryptographically erased for best data security.
*** Additional Considerations -Please Read
Usernames who can decrypt the storage volumes on device startup are limited to a) usernames created with either the Setup Assistant or b) usernames created with the Users & Groups system preference panel. These usernames have what is called a Secure Token allowing them and only them to decrypt the disk. To be clear, usernames that are network users (like most <NCSU>.admin accounts), local accounts created with XCreds or Jamf Connect on demand, sysadminctl, or Jamf policies will not be able to decrypt the disk without manual work. This profile is setup to escrow the recovery key which can be used to decrypt the disk both for login and disk repair and will require a password change when used. For devices managed using the configuration management system (JAMF Pro) and running macOS 10.15.3 or newer on devices with the T2 security chip and all Apple Silicon devices , another encryption key is saved called the Boot Strap token. This Boot Strap token should be used by the configuration management system to grant usernames created using policies additional Secure Tokens allowing them to decrypt the data volumes.
For versions of macOS before 10.15.x, other methods maybe needed to escrow keys or grant secure tokens to usernames. Best practice is to upgrade all devices to macOS 13.0 or newer. Several of these posts provide great information and guides to working with FileVault II on earlier versions of macOS: https://derflounder.wordpress.com/category/filevault-2/
Patch Standard – macOS Patching
NOTE: No OS update happens quickly! There is no real-time OS update. Many Apple OSes are multi-gigabytes in size and take 30 min+ just to download and much longer depending on network speed. macOS typically takes 20+ minutes on top of the download to install. Best practice is to create an advanced report with criteria of "greater than 0 software updates available" and monitor that to attest patching.
1) The best practice for macOS patching is to offer Apple software updates to the end user allowing them to defer updates. This is the best way to patch with out disrupting anything critical (teaching, video conferencing, etc) they might be doing. Accomplish this using 3 features in Jamf Pro:
1) a configuration profile to set the Software Update option and Restrictions option scoped to all devices so automatic updates are enabled and optionally deferral is allowed.
The Software update option should check:
Automatically install macOS updates
Automatically install app updates from the App Store
Automatically check for updates
Automatically download new updates when available
Automatically install configuration data
Automatically install system data files and security updates
ALL other options should be unchecked to disable them. The software update server feature is deprecated and should be left blank
The option should look like:
The Restrictions option should be set to:
Defer updates of Only Major Software Updates to 7 days (or length of choice) like:
NOTE: The Restrictions Option has several settings that should be examined closely since the profile sets all of them INCLUDING THOSE NOT CHECKED!
Scope this profile to all devices in the Site.
This will get the vast majority of devices updated in up to 90 days depending on the deferral.With macOS 14+ Apple now builds in notification that strongly pushes updating the longer folks wait.
However there will be times when update must be done more quickly due to security concerns or software compatibility needs. To manually force updates prepare these features of Jamf Pro ahead of time:
2) a Jamf Pro Smart Group that has the criteria of "Number of Available Updates is greater than 0" named "Patches Needed"
Like:
3) the Jamf Pro feature "Software Updates" by checking the "Patches Needed" smart group and selecting the button "Update 1 Selected"
Now choose the desired update commands to send to the device. For the absolute must update as soon as possible, data destructive, option use the "Download, install and Restart" option and select "Latest version based on device eligibility."
This will reboot when update requires with no regard for what the users is doing and their data will NOT BE SAVED!
Press the Apply button to send the commands to the devices via DDM/MDM.
NOTE: Nothing about this is fast! Major OS update can be 12+ gig in size and can take 30+ minutes just to download. After that most macOS update take around 20 minutes or so to install. This assumes that the device is on a reachable network and laptops either have 50%+ battery or are plugged into AC power.
Be patient, devices will drop out of the smart group as the update complete and inventory updated in Jamf Pro.