Following are quick outlines of how to setup Jamf Pro Policies and Profiles for specific tasks. These should be used as a guideline only! As always TEST policies on a small group of devices before deploying them to an entire Group or Site.
Quick Index
Implementations for the Endpoint Protection Standard
AntiMalware/Antivirus
Application Control
Authentication
Encrypted Network Communication
Full Disk Encryption (with key escrow)
Host-based Firewall
Least Privilege Access
Software Inventory
Web Reputation Filtering
macOS Patching
(also see Required Jamf Pro Implementation of Endpoint Protection Standard)
Interesting Software and Tips
In-App Purchases with App Store Apps and Managed Apple Accounts
Using JSON Profile Manifests for easy macOS Configuration
Allowing Privilege Elevation Exceptions
Alternative Authentication with XCreds
Alternative Authentication – Jamf Connect
Alternative Authentication – Disabling XCreds/Jamf Connect/NoLoAD when things go wrong
Apple Kerberos Single Sign On Extension
Create a Policy Banner at macOS loginwindow
Printer Setup
InCommon Certificate for Cisco Jabber
Configuration Profile for Cisco AnyConnect VPN System Extension
Create a Launch or Install Policy for Self Service
Setting the Date, Time, and Time Zone
How to buy Apple Volume Purchase Credits at NCSU
Add App Store Apps with Devices Licenses
Install Rosetta2 silently on Apple Silicon Devices
Updating Profile UUID’s to be Unique
“Encourage” macOS updates with a policy
Service Management Managed Login Items Rules (macOS 13+)
Suppress Notification for Managed Background and Login Items (macOS 13+)
Manage Apple Intelligence Features
URL for directly loading graphics from Google Drive
Resources for Apple Admins
VPP Token Renewal Process Step by Step
ADE Token Renewal Process Step by Step
Least Privilege Access
Meeting this control is simply setup methodology where accounts are not created with full administrative access to the device. In macOS, Apple allows creation of Administrator, Standard, and Sharing Only accounts. Creating new users with the account type Standard will meet the control. Commonly you will hear complaints from end users that this does not allow them to install software. The intent of this control is to protect the data stored on the device NOT to keep software from being installed! In today’s world software can be run from external storage like key drives or even directly downloading to the home directory and running from there where no extra permissions are required. Best practice for software installation is the direct clients to use Jamf Self Service.app as no elevation of permissions are needed. If software installation permissions are needed these can be granted using the authorization database without giving full administrative access.
To allow installation of software only create a Jamf policy which configures the Files and Processes Option to have an Execute Command of:
/usr/bin/security authorizationdb write system.install.software <<< $(/usr/bin/security authorizationdb read system.install.software | /usr/bin/sed 's/admin/staff/g')This uses the security command line tool to read the system.install.software rule in the authorization database replace the value of the group setting with the group staff and write it back again. All users are in the staff group and this will not interrupt the builtin Apple install mechanisms nor those used by configuration management. To verify that this worked use the command line:
/usr/bin/security authorizationdb read system.install.softwareAnd look for the group key:
<key>group</key>
<string>staff</string>
Note: Standard Users will still have to type in their username and password to complete the install but admin permissions are not required.
For exceptions where full administrative access is required
Best practice for granting exceptions for administrative access is to allow time limited privilege elevation that can be granted using the SAP Privileges.app version 2.1 or newer from https://github.com/SAP/macOS-enterprise-privileges or using the setting in Jamf Connect.
SAP Privileges.app is available in Jamf Pro in the Jamf Apps section as a Jamf Catalog App and does not require a license.
For NCSU deployments a pre-configured, Jamf JSON template file that enables remote logging of the elevation request via a webhook is available at
NCSU SAP Privileges Configuration Profile(NCSU Login Required)
A default, blank Jamf JSON template for SAP Privileges is also available at:
https://github.com/SAP/macOS-enterprise-privileges/blob/main/application_management/Privileges2_manifest.json
Logging of elevation requests is enabled in a Configuration Profile for the Preferences Domain corp.sap.privileges by setting the ServerType under the Remote Logging settings to "webhook" and the ServerAddress to the Uniform Resource Identifier (URI) of the remote webhook target.
Logging directly to Splunk (a commonly used Security Information and Event Management system or SIEM) can be accomplished using a HTTP Event Collector (HEC) target as the webhook. In the case of Splunk the form of the URI would be https://<splunkservername>.<sld>.<tld>:<port>/services/collector/raw?token=xxxx or https://<splunkservername>.<sld>.<tld>:<port>/services/collector/event?token=xxxx. In order to avoid authentication issues a token will need to be provided by the Splunk service administrator. NOTE some setup in the Splunk service is required. See:
https://docs.splunk.com/Documentation/Splunk/9.4.0/Data/UsetheHTTPEventCollector and https://docs.cribl.io/stream/sources-splunk-hec/
Reporting on these elevations in Splunk is beyond the scope of this document but a basic search would include an index and source type. It could also include Custom Data if configured in SAP Privileges. The search might look like index="privlog" sourcetype="privileges:webhook" "custom_data.serial"=xxxx assuming the Splunk service was configured for an index named privlog. For more information on Custom Data and configuration with Jamf Variables see the Remote Logging section of the SAP Privileges Configuration profile documentation at https://github.com/SAP/macOS-enterprise-privileges/wiki/Managing-Privileges#configuration-profiles
Jamf Connect is built into Jamf Pro in the Jamf Apps section as a Jamf Catalog App but does require a paid license configuration profile(NCSU admins should contact OIT Licensing to purchase). Read the Jamf Connect documentation for setup as there are several options.( https://learn.jamf.com/en-US/bundle/jamf-connect-documentation-current/page/Privilege_Elevation_Local_Accounts.html)
Alternative Authentication – XCreds
XCreds software is a macOS Security Agent Plugin and Menu Bar App that allows authentication and password sync with OAuth providers such as MS Azure, Google Identity and others via the OIDC standard. This software is free for use by the entire campus at no charge.
Use the package in Jamf Pro with the latest version number like NCSU-Campus-XCreds-xxx.pkg in a Jamf Prestage or Policy to install.
Two configuration profiles are required to use XCreds:
- XCreds license file (authentication required): go.ncsu.edu/xcredslic
- To configure XCreds for use with NC State Entra Id download the Jamf JSON manifest for the configuration profile from
(authentication required): https://drive.google.com/file/d/1Opq2ukaboR7bCcBW861g4EITmb0FsN3-/view?usp=share_link
Optional: Kerberos Tickets for legacy, on campus file and print services with XCreds 5.1 or newer
XCreds 5.1 or newer supports getting kerberos tickets (TGT and SGT) for services that still require them like legacy file and print to on-prem servers. This will require that the endpoint is on the campus network either physically or via VPN. To enable this feature first make sure XCreds is updated to version 5.1 or newer. Second enable the following keys in the configuration profile:
ADDomain with value = wolftech.ad.ncsu.edu
and
mapKerberosPrincipalName with value = UPN
Save the configuration profile and redistribute it to all devices.
NOTE:
Upload these profiles to your Jamf Site , assign it to All devices and remember to check it in the PreStage Enrollment.
If you want the XCreds.app to run and sync passwords be sure an add it to your Managed Login Items using the com.apple.loginitems.managed payload. There is a good JSON template at: https://github.com/Jamf-Custom-Profile-Schemas/ProfileManifestsMirror/blob/main/manifests/ManifestsApple/com.apple.loginitems.managed.json
To learn more about how to use Jamf JSON Manifests see the Using JSON Profile Manifests for easy macOS Configuration section.
For more details on XCreds see: https://github.com/twocanoes/xcreds/wiki/AdminGuide
Alternative Authentication – Jamf Connect
Jamf Connect software is a commercial, for-pay, macOS Security Agent Plugin and Menu Bar App that allows authentication and password sync with OAuth providers such as Okta, MS Azure, Google Identity or others. For information on how to configure Jamf Connect at NC State University see (authentication required):
https://docs.google.com/document/d/19aHSs4unm8K9k5duOB_20ueXq4KZEG1w3cuPv3eAFbg/edit?usp=sharing
Alternative Authentication – Disabling XCreds/Jamf Connect when things go wrong
Sometimes the alternative authentication software like XCreds/ Jamf Connect/ NoLoAD will fail for unknown reasons or due to some change to the OS after a major update. All of these packages work by replacing the macOS login window.app with a trusted security helper. Apple allows is by making changes to the authorization rules stored in /var/db/auth.db database file. Normally this is controlled by using the /usr/bin/security tool through something like authchanger or xcreds.sh. However none of these methods work in recovery mode if you can not login at all.
The easy way to reset to the native loginwindow.app is to remove the authentication database and reboot. macOS will recreate the authentication database with defaults allowing loginwindow.app to work. Here are the steps
1) Reboot into recovery mode
2) Run Terminal.app from the Utilities Menu
3) Type:mv /Volumes/Macintosh\ HD/var/db/auth.db /Volumes/Macintosh\ HD/var/db/auth.bak
Then reboot. This will bring back the loginwindow.app like normal.
For all packages a quick reinstall cures the issues we have seen.
More information at:
https://docs.jamf.com/jamf-connect/2.6.0/documentation/Editing_the_macOS_loginwindow_Application.html
Printer Setup
Printers are either very trivial or overly complex to deploy on macOS depending on who made the printer and what features need to be supported. The most reliable method is not the default printer setup provided by Jamf Pro.
Jamf provides printer mapping not printer creation.
Instead, the two (2) methods that actually work are either
a) use a Printing configuration profile for the domain com.apple.mcx.printing like the example XML profile from OIT named Template-com.apple.mcxprinting.ncsu.mobileconfig (click to download)
or
b) setup the printer using the lpadmin Unix command line tool that configures CUPS after installing the additional required software packages for the printer. Starting with macOS 10.15.x Apple has restricted network printing to the ipp or ipps protocol (direct attached USB should work ongoing and smb based printing still seems to work but I would not expect it to be there in future versions of macOS.)
–Configuration Profiles – the easy way to setup most printers
Most modern printers and print servers support ipp or ipps print protocols. These should be setup up as “Air Print” or “IPP Everywhere” printers by IP Address or DNS name using the downloadable Template-com.apple.mcxprinting.ncsu.mobileconfig .
When you import this mobileconfig file the settings will actually show up under the Printing payload since Jamf already supports the com.apple.mxcprinting domain.
The OIT Template can be modified to add printers that are not already in the Jamf Printers mapping ( mappings require packaging permissions to create and can be unreliable). The example mobileconfig also shows how to use “AirPrint” PPD files on remote servers to get consistent deployments without loading local PPD files.
Be aware that opening the the OIT template in Profile Creator.app or iMazing Profile Creator.app will corrupt it due to having multiple printers. Edit the file with a text editor like BBEdit for best result.
The xml code block to add a printer into the UserPrinterList key looks like this:
Copy and Paste this block and edit as needed.
In Jamf Pro use Method #2 from docs.jamf.com/technical-articles/Deploying_Custom_Configuration_Profiles_Using_Jamf_Pro.html to upload the mobileconfig file into the configuration profile setup.
Note: What Apple calls AirPrint has 2 parts, one for self discovery of printers that uses DNS SD and one for actually printing to the printers which uses ipp/ipps protocols. By using Configuration Profiles to setup printers we get to skip the discovery part and directly add the printer by IP address or DNS Name. The “AirPrint” PPDs have nothing to do with this and are generalized postscript printer description files that allow the configuration of common printer options and in some cases talking directly to some pinters/print servers to discover installed options for configuration.
See example at
https://www.jamf.com/jamf-nation/feature-requests/6026/add-airprint-as-a-macos-configuration-profile-payload-option
Again, multifunction printer with multiple output options may not work with a configuration profile alone and additional software installation may be require or more advanced methods listed in this document may be required.
Always test the configuration profile method first as it is the simplest and more easily maintained.
–Printer Setup with the Install_Printer_from_Airprint_Info script in Jamf Pro – when profiles do not work
When configuration profiles have been tried and do not work, OIT has provided a printer setup script in Jamf Pro named “Install_Printer_from_Airprint_Info” based on https://gist.github.com/apizz/5ed7a944d8b17f28ddc53a017e99cd35. (NOTE: this script may or may not work if printing to a print server so test well) The script uses command line tools to talk to the IP address or DNS name of a network printer over the ipp protocol and pulls back the AirPrint printer configuration information needed. The printer configuration information is then processed with the ipptoppd tool to create the correct PPD file and the printer is added using the lpadmin command line tool.
Best practice is to create a Jamf Policy and add the script named “Install_Printer_from_Airprint_Info”. The script will require Parameter Values for only 1 printer. It is also best practice to have 1 policy per printer. To setup a printer, fill in values for:
IP Address or a fully qualified DNS Name for the printer
PRINTER_NAME_no_spaces_allowed – a name the CUPS print system will use for the printer. NOTE: as the label says no spaces are allowed in this parameter
PRINTER DISPLAY NAME – optional readable name for CUPS web interface. NOTE: if this is set in the configuration information on the printer this value may be replaced.
PRINTER LOCATION –This is the name that will appear in the print dialog.
REQUIRE_ICON – optional Set to string true or string false not a Boolean (defaults to false if left blank) NOTE: if this is true and no icon is available the script will ABORT and the printer setup will FAIL.
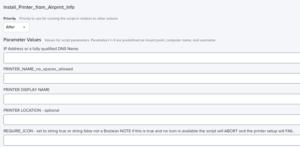 Parameter Values for Install_Printer_from_Airprint script in Jamf Pro
–Printer Setup with lpadmin – when nothing else works
When configuration profiles and the Install_Printer_from_Airprint_Info script have been tried and they don’t work, then we need to know what type of printer protocol is used for a manual setup with the lpadmin tool. For most of these “other” printers the most reliable setup is to create a Jamf Pro Policy that has a “EXECUTE COMMAND” set on the “Files and Processes” option to use the lpadmin command line tool.
WARNING: Most printers that need lpadmin to deploy ALSO require additional software beyond the printer setup and may require multiple install packages installed in a specific order to make them work.
The general command is:
lpadmin -p SomePrinter -D “Some Printer” -E -v ipp://example.ncsu.edu/queuename -P /System/Library/Frameworks/ApplicationServices.framework/Versions/A/Frameworks/PrintCore.framework/Versions/A/Resources/AirPrint.ppd
Best practice here is to set up the printer on a macOS device so you know it works. Make a list of any extra installer packages and configuration files that it takes for an actual print out to work. After everything works, look at the file /etc/cups/printers.conf file. WARNING: In macOS 10.15.0+ Apple has added this note to the lpadmin man page “Note: PPD files and printer drivers are deprecated and will not be supported in a future version of CUPS” This means the -P option in lpadmin will stop working in future versions of macOS.
The printers.conf file will have 1 or more entries wrapped in the xml tags <Printer somename> </Printer> like
<Printer WolfPrint_BlackAndWhite>
PrinterId 5
UUID urn:uuid:bc59184e-e6cf-30f1-6988-2c47b7df094b
AuthInfoRequired none
Info WolfPrint-BlackAndWhite
MakeModel Generic PostScript Printer
DeviceURI ipps://print.ncsu.edu/printers/WolfPrint-BlackAndWhite
State Idle
StateTime 1568986117
ConfigTime 1576252195
Type 8400988
Accepting Yes
Shared No
JobSheets none none
QuotaPeriod 0
PageLimit 0
KLimit 0
OpPolicy default
ErrorPolicy abort-job
</Printer>
We need 2 strings out of the printers.conf file: a) the name part from the first tag (in example here would be WolfPrint_BlackAndWhite) and b) DeviceURI (here ipps://print.ncsu.edu/printers/WolfPrint-BlackAndWhite).
The lpadmin command would look like:
lpadmin -p WolfPrint_BlackAndWhite -D “WolfPrint_BlackAndWhite” -E -v ipps://print.ncsu.edu/printers/WolfPrint-BlackAndWhite -P /System/Library/Frameworks/ApplicationServices.framework/Versions/A/Frameworks/PrintCore.framework/Versions/A/Resources/AirPrint.ppd
Some good information is at:
https://www.jamf.com/jamf-nation/discussions/31099/adding-printer-to-mac-via-terminal-command-line-for-airprint
Again these are for printers that use ipp/ipps and have no special setup requirements (thus can use the AirPrint.ppd printer description file. These are color or black and white, postscript or PCL printers that are single or double sided printing on 8.5″x11″ paper with no more than 2 paper trays (manual feed usually works too).
Other “universal” PPDs available in recent version of macOS are:
/System/Library/Frameworks/ApplicationServices.framework/Versions/A/Frameworks/PrintCore.framework/Versions/A/Resources/Generic.ppd
/System/Library/Frameworks/ApplicationServices.framework/Versions/A/Frameworks/PrintCore.framework/Versions/A/Resources/GenericPrinter.ppd
NOTE: If a printer requires a PPD for other functions (staple, fold, etc) that ppd will have to be put in place with an installer package and the correct path to it provided for the lpadmin command. These vary by vendor and change frequently so it just has to be figured out for each deployment.
For printers that use other network protocols like lpd, smb, etc the DeviceURI will be different so just copy/paste from printers.conf.
If the prinrters are multi-function, there will be additional setup packages required.
If you want to explore more complex printer setup have a look at:
https://oit.ncsu.edu/help-support/apple/cups-setup-for-wolfcopy-on-mac-os-x-10-5/
If you need to set some Pre-Sets for printers on macOS (preferences for Double Sided, etc) have a look at this link:
https://aporlebeke.wordpress.com/2020/07/17/building-deploying-mac-printer-presets/
Install InCommon Certificate for Cisco Jabber
The installation of the Cisco Jabber software for macOS here at NCSU requires an InCommon Certificate that is not included with macOS by default. The certificate must be added to the user’s keychain. To install the certificate for users in a Jamf Site the following macOS configuration profile can be used with slight modification to update the uuid number for the profile identifier. Here are the steps:
- Download the template configuration profile at:
https://drive.google.com/open?id=1cvuS3lnjAtG5AEW2oNjaxPjLP1Tt7KJP - Unzip the file by double clicking on it.
- Next change the UUID number of the profile so it is unique by following the instructions in this document at section Updating Profile UUID’s to be Unique.
- Then upload to Jamf Pro using Method #2 from docs.jamf.com/technical-articles/Deploying_Custom_Configuration_Profiles_Using_Jamf_Pro.html.
Updating Profile UUID’s to be Unique
First Download and install iMazing Profile Editor.app from
https://imazing.com/profile-editor
Then run iMazing Profile Editor.app and Open the template configuration profile .
In the General section look for the UUID field.
The uuid number in the UUID field of every configuration profile needs to be unique in all of JAMF.
Generate a new uuid number by opening the Terminal. app and using the uuidgen command.
The command will look something like this:
$ uuidgen
AA724EBA-DC4B-499E-88BC-FB66809C4CB7
Now copy and paste the newly generated uuid number into the UUID field in iMazing Profile Editor.app and save the profile by Selecting Save from the File menu to create a new copy for uploading to Jamf Pro.
Create a Launch or Install Policy for Self Service
Here is a little trick for those interested in creating a jamf policy that either launches an app or runs a policy to install it.
There is an interesting way to use the Files and Processes option in a Jamf Policy and the || operator from the shell to make this happen. If a command line tool fails then the || operator provides for another command to run. The general idea is:
/usr/bin/open -a “some application” || /usr/local/bin/jamf -event someCustomTrigger
So we use the open tool with the -a switch to try and open a named application and bring it to the front most window. If this fails then we run the jamf binary to execute the existing custom trigger policy.
Another example:
/usr/bin/open -a “TextEdit” || /usr/local/bin/jamf -event installTextEdit
Remember of course that the policy calls a custom trigger which would have to exist already (usually one of your existing policies but just add a custom trigger).The policy can be added to the Jamf category -Launcher to make it easier to find.
The policy in Jamf Pro would look like this:
Note: this image also shows how to open the app on successful install using the && operator.
—
Setting the Date, Time, and Time Zone
Use the Template macOS Configuration Profile that sets the time zone to America/New_York and configures the Date and Time system preference panel to use time.ncsu.edu. Remember to change the uuid number to avoid profile conflicts in Jamf Pro
Template Date and Time Configuration Profile
Adding App Store Apps with Devices Licenses
Many popular apps for Apple devices are available in the App Store and can be easily installed as Device Licensed applications.
The steps are:
1) Login to school.apple.com and select Apps and Books under the Content section on the left side bar. Note: The id must have Content Management permissions in Apple School Manager.
2) Find the app you want (Word, etc). Warning here is that many apps, MS included, have both iOS and macOS versions. To make it easier click on the blue and white sort icon (ice cream cone shaped) and set the Type to “Mac”, etc.
3) “Buy” for $0.00 the number of copies needed by filling in the Quantity and pressing the Get button. This will start the license generation process.
4) WAIT until an email confirms the licenses are ready.
5) In Jamf Pro, select Computers> Mac App Store Apps> +New
6) Search for desired app and click the Add button on the far right.
7) Set a category, Self Service details, etc, add Scope like any other policy.
8 ) Now click save.
9) Now that the App Store App is created, edit it a 2nd time, click Managed Distribution (right most tab) and check the box Assign Content Purchased in Volume
10) Verify that Total Content matches the licenses you purchased (or the total purchased if more than one purchase of the same app has been made) and Click Save again.
NOTE: The In Use number does not always equal the number physically installed. It just means that the license is assigned and that many devices have confirmed with the JSS they will use the license. The install may not have happened yet especially if deployed using Self Service. If VPP numbers don’t match, wait about 1 hour and confirm again. For very large purchases 1,000 + copies it may take 4 or more hours to finish the license generation so wait for that confirmation email.
Install Rosetta2 silently on Apple Silicon Devices
/usr/sbin/softwareupdate --install-rosetta --agree-to-license
“Encourage” macOS Software Updates with Jamf Policy
/usr/bin/osascript -e 'display dialog "University Rule 08.0.14 requires all software updates to be installed. Please install the waiting updates now to remain secure." with title "macOS Updates Required for all NC State University Computers" with icon stop giving up after 60' && /usr/bin/open x-apple.systempreferences:com.apple.Software-Update-Settings.extension
Service Management Managed Login Items Rules (macOs 13+)
This includes important Launch Agents, Launch Daemons, etc that are part of anti-malware, backup, and other services that should run at all times.
OIT is providing a template configuration profile that covers the background software associated with several commonly used packages. These include Crowdstrike Falcon, CrashPlan, Xcreds, Zoom, DetectX-Swift, Cisco AnyConnect, SAP Privileges, and Alertus.
To use the Template:
First create a JAMF computer smart group with the criteria of
“Profile Identifier” IS com.jamf.servicemanagement.backgroundapps
which will limit the distribution of the profile to only those devices able to use these settings.
BE SURE TO SCOPE using the Smart group that has com.jamf.servicemanagement.backgroundapps as it’s criteria.
Suppress Notification for Managed Background and Login Items (macOS 13+)
To suppress these for software under MDM management use a Jamf configuration profile that turns off Critical Alerts and Notifications for com.apple.btmnotificationagent. To do this follow section 5 of HCS white paper Manage_Background_Tasks_Jamf.pdf at https://hcsonline.com/images/PDFs/Manage_Background_Tasks_Jamf.pdf.
BE SURE TO SCOPE using the Smart group that has com.jamf.servicemanagement.backgroundapps as its criteria to avoid looping profiles.
Create a Policy Banner at macOS loginwindow
To show a banner for showing policy requirements, EULA, etc at the macOS Login Window, Apple says to place a file
named PolicyBanner.txt (or .rtf) in the folder /Library/Security/
This will automatically be displayed over the login window dialog that must be approved before login.
See https://support.apple.com/en-us/HT202277 for full details.
Manage Apple Intelligence Features
To manage Apple Intelligence features on operating systems that support them settings in 3 preference domains must be configured. NOTE: in all of the these domains there are other settings not related to Apple Intelligence that can be managed as desired. Be sure to verify that other configuration profiles do not have overlapping keys of the same name as most allow only one setting per domain:key instance on the same machine.
1) Initial setup in Setup Assistant
Preference Domain: com.apple.SetupAssistant.managed
https://github.com/Jamf-Custom-Profile-Schemas/ProfileManifestsMirror/blob/main/manifests/ManifestsApple/com.apple.SetupAssistant.managed.json
Initial setup of Apple Intelligence at login per user
Key: SkipItems
Value: Intelligence
Note there are multiple items in this domain unrelated to Apple Intelligence that may also be set as desired.
2) Notification of availability
Preference Domain: com.apple.notificationsettings
https://github.com/Jamf-Custom-Profile-Schemas/ProfileManifestsMirror/blob/main/manifests/ManifestsApple/com.apple.notificationsettings-macOS.json
In the Notification Settings array add a dictionary with:
Key:BundleIdentifier
Value: _SYSTEM_CENTER_:com.apple.followup.alert
Key: CriticalAlertEnabled
Value: Boolean
Key: NotificationsEnabled
Value: Boolean
NOTE there may be other applications you want to add to this array
3)Intelligence features
Preference Domain: com.apple.applicationaccess
https://github.com/Jamf-Custom-Profile-Schemas/ProfileManifestsMirror/blob/main/manifests/ManifestsApple/com.apple.applicationaccess-macOS.json
Genmoji
Key: allowGenmoji
Value: Boolean
Image Playground
Key: allowImagePlayground
Value: Boolean
Writing Tools
Key: allowWritingTools
Value: Boolean
Summarize emails
Key: allowMailSummary
Value: Boolean
Use of external, cloud-based intelligence services with Siri
key: allowExternalIntelligenceIntegrations
Value: Boolean
Can authenticated external intelligence providers be used.
Key: allowExternalIntelligenceIntegrationsSignIn
Value: Boolean
NOTE: If a user is already signed in to an external intelligence provider, applying this restriction will cause them to be signed out when the next request is attempted.
Note there are multiple items in this domain unrelated to Apple Intelligence that may also be set as desired.
URL for directly loading graphics from Google Drive
Several Apple Management tools like Root3 Support.app and Jamf Setup Manager.app can load icons and other graphics directly from a URL. When customizing graphics it is useful to have copies in a stable location like Google Drive. However the "Sharing" link for google files are not the direct link needed for configuration in most management tools. To get the link to the actual downloadable file requires manually crafting a URL using the Google File ID. This is the identifier sting that shows up in the Sharing Link after the /d/ sequence. For example, selecting the Share>Get Link item on a graphic file ending in .png will give a url like:
https://drive.google.com/file/d/15aiSA3fLlEXqymmK2uKvXYSM6b8-P4ya/view?usp=share_link
The string after the /d/ sequence, shown here in bold, is the Google File ID.
Once that File Id has been copied, add it to the end of this base URL:
https://drive.google.com/uc?export=download&id=
To yield the full URL of:
https://drive.google.com/uc?export=download&id=15aiSA3fLlEXqymmK2uKvXYSM6b8-P4ya
This link will then direct the File or URL handler in most management software to download the actual .png file stored on Google Drive.
NOTE: the file MUST be shared with "Any one who has the link" in Google Drive for this to work.
-----